Hi, we just developed an OpenSource tool which helps developers, mostly UI and Front End Developers for image mapping task. If you are a beginner you might be confused?. That's okay. Let me explain all about this Quick Image Mapping Tool and Tutorial With CSS Effects.
What is Image Mapping?
Image mapping a tool which helps you to select an area of an image based on coordinate systems. You can apply several changes on selected area as per your requirements.
Ever you read e-paper?
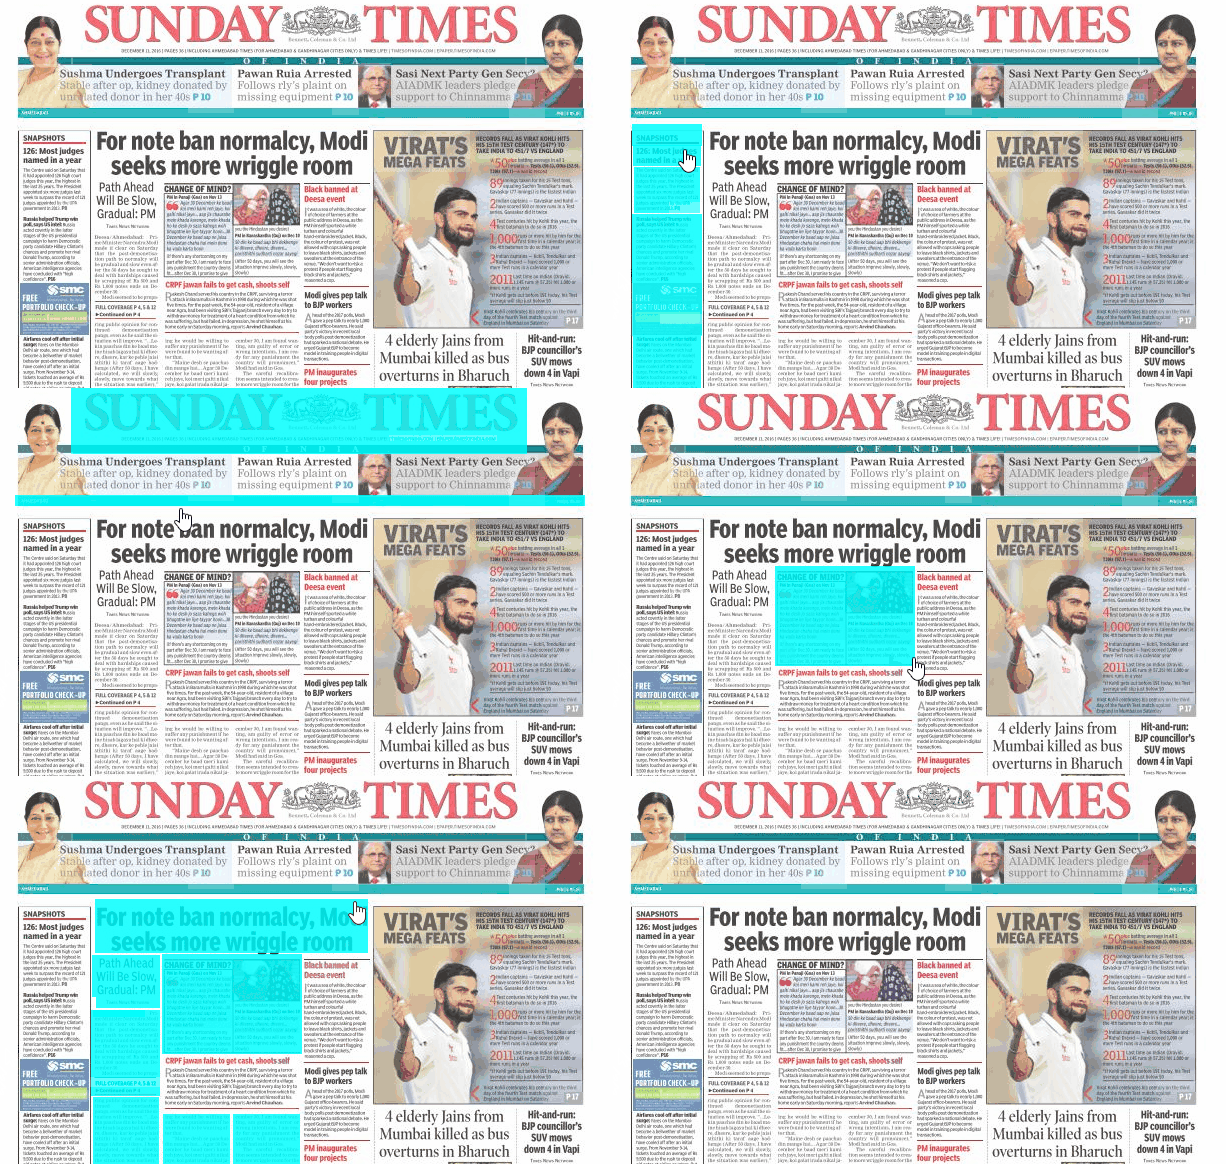
When you read e-paper you can see the actual effect of image mapping, a single image with many links with coordinates mapping, means in above image you can see multiple links on a single image.
In such case area of an image divided into many parts depends on their coordinate system. For example, let's assume an image width of 800px and divide into two parts:
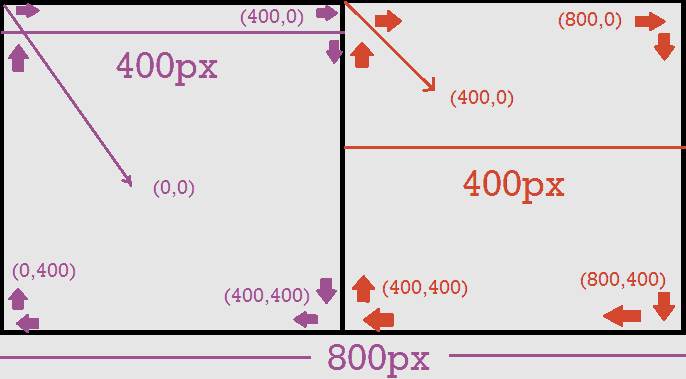
For the first block: Coordinates start from (0,0) and move in a polygon, so next area will be (400,0). Here X1=0, Y1=0, X2=400, Y2=0, when the move will be finished:
Coordinates will be: 0,0,400,0,400,400,0,400
Values are:
X1=0, Y1=0
X2=400, Y2=0
X3=400, Y3=400
X4=0, Y4=400
For the second block: Coordinates start from (0,0) and move respectively as below:
Values are:
X1=400, Y1=0
X2=800, Y2=0
X3=800, Y3=400
X4=400, Y4=400
Coordinates: 400,0,800,0,800,400,400,0
HTML format for Image Mapping:
After selecting the perfect coordinate for your image you have to use in your HTML document as below format:
<img src="YourImageURL" alt="QuickMap" Class="QuickMap" usemap="#QuickMap" />
<map name="QuickMap" id="QuickMap">
 <area alt="" title="" href="#" shape="poly" coords="0,0,0,400,400,400,400,0" />
 <area alt="" title="" href="#" shape="poly" coords="400,0,400,400,800,400,800,0" />
 <area../>
</map>
First, you should provide a source of your image, it can be locally or globally doesn't matter. After that in map tag, you have to pass a coordinate value as above example.
Applying CSS on Image Mapped Area:
It can be quite tricky to applying CSS on selected area, but not a big task. I just modified a plugin to do the same task quick and without your too much efforts. Add below code after your image map HTML.
It will convert your selected area into HTML Canvas and open multiple options for CSS effects.
<script type="text/javascript">
function QuickImageMap(){
 $.fn.QuickMap.defaults = {
 fill: true,
 fillColor: 'f0f0f0',
 fillOpacity: 0,
 stroke: true,
 strokeColor: 'f0f0f0',
 strokeOpacity: 1,
 strokeWidth: 6,
 fade: true,
 alwaysOn: false,
 neverOn: false,
 groupBy: false,
 wrapClass: true,
 // plenty of shadow:
 shadow: false,
 shadowX: 0,
 shadowY: 0,
 shadowRadius: 0.8,
 shadowColor: 'f0f0f0',
 shadowOpacity: 0.8,
 shadowPosition: 'outside',
 shadowFrom: false
 }
};
$(function() {
 $('.QuickMap').QuickMap({
 fillColor: 'ffffff'
 });
});
</script>
<script type="text/javascript" src="https://raw.githubusercontent.com/himstar/Advanced-Image-Mapping-Tool/master/quickmap/QuickMap.js"></script>
You can also try Quick Image Mapping Tool and Tutorial With CSS Effects from below link:
Demo / Generate Get it on GitHub
That's it. Everything was done, enjoy !!


 About UsFind out working team
 AdverisementBoost your business at
 Need Help?Just send us a
 We are SocialTake us near to you,